Would you like to add your own indicators to B4 CoPilot Pro and create your own custom strategies? Now you can.
CoPilot Pro v7 not only allows you to create algos quickly, it also shows historical signals on your chart and lets you fine-tune your own algo using B4 CoPilot Pro’s order flow engine. You can enhance your existing NinjaTrader indicators and strategies to output compatible trend direction filters and trade entry signals to B4 CoPilot Pro.
Here is how easy it is to integrate your own indicators and strategies into B4 CoPilot Pro. (Note: A complete sample indicator is attached at the end of this post.)
Step 1: Add Integration Variables (Static Code)
Add the following section to the top of your indicator. It allows you to enable or disable entry and/or confirmation outputs for B4 CoPilot Pro. This gives you the flexibility to pick and choose a combination of inputs for your strategy.
Step 2: Update Configuration (Static Code)
Update the configuration section of your indicator to initialize the outputs needed for B4 CoPilot Pro integration:
Step 3: Create Signal Outputs (Your Custom Code)
Create your own signal and confirmation outputs in the OnBarUpdate() method. Assign true to either Buy or Sell signals as appropriate. If your indicator supports trend direction, assign the relevant value to the confirmation direction output.
Step 4: Add Custom Indicators to Chart
Add your custom indicators to your chart before starting B4 CoPilot Pro.
Step 5: Enable Integration
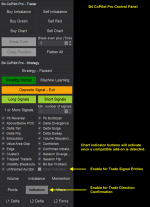
Enable indicator integration, alongside order flow and footprint signals, in B4 CoPilot Pro for signals and/or confirmations to be processed.

CoPilot Pro v7 not only allows you to create algos quickly, it also shows historical signals on your chart and lets you fine-tune your own algo using B4 CoPilot Pro’s order flow engine. You can enhance your existing NinjaTrader indicators and strategies to output compatible trend direction filters and trade entry signals to B4 CoPilot Pro.
Here is how easy it is to integrate your own indicators and strategies into B4 CoPilot Pro. (Note: A complete sample indicator is attached at the end of this post.)
Step 1: Add Integration Variables (Static Code)
Add the following section to the top of your indicator. It allows you to enable or disable entry and/or confirmation outputs for B4 CoPilot Pro. This gives you the flexibility to pick and choose a combination of inputs for your strategy.
Code:
#region B4 CoPilot Pro Integration Variables
[NinjaScriptProperty]
[Display(Name="B4 Entry Signals Enabled", Order=1, GroupName="B4 CoPilot Pro Integration")]
public bool B4UseEntrySignals { get; set; }

[NinjaScriptProperty]
[Display(Name="B4 Confirmation Signals Enabled", Order=2, GroupName="B4 CoPilot Pro Integration")]
public bool B4UseConfirmations { get; set; }

private Series<bool> B4BuySignal;
private Series<bool> B4SellSignal;
private Series<int> B4ConfirmationDirection;

[NinjaScriptProperty]
[Browsable(false)]
[XmlIgnore]
public Series<bool> B4BuySignals {
    get { return B4BuySignal; }
    set {}
}

[NinjaScriptProperty]
[Browsable(false)]
[XmlIgnore]
public Series<bool> B4SellSignals {
    get { return B4SellSignal; }
    set {}
}

[NinjaScriptProperty]
[Browsable(false)]
[XmlIgnore]
public Series<int> B4ConfirmationDirections {
    get { return B4ConfirmationDirection; }
    set {}
}
#endregion
Step 2: Update Configuration (Static Code)
Update the configuration section of your indicator to initialize the outputs needed for B4 CoPilot Pro integration:
Code:
else if (State == State.Configure) {
    #region B4 CoPilot Pro Integration Initialization
    B4BuySignal = new Series<bool>(this, MaximumBarsLookBack.Infinite);
    B4SellSignal = new Series<bool>(this, MaximumBarsLookBack.Infinite);
    B4ConfirmationDirection = new Series<int>(this, MaximumBarsLookBack.Infinite);
    #endregion
}
Step 3: Create Signal Outputs (Your Custom Code)
Create your own signal and confirmation outputs in the OnBarUpdate() method. Assign true to either Buy or Sell signals as appropriate. If your indicator supports trend direction, assign the relevant value to the confirmation direction output.
Code:
protected override void OnBarUpdate() {
    // Example
    // Replace with your indicator logic

    // Set Buy Signal
    B4BuySignals[0] = true;

    // Set Sell Signal
    B4SellSignals[0] = true;

    // Set Confirmation Direction
    // 0 : Neutral (no trade)
    // 1 : Bullish
    // -1 : Bearish
    B4ConfirmationDirection[0] = 1;
}
Step 4: Add Custom Indicators to Chart
Add your custom indicators to your chart before starting B4 CoPilot Pro.
Step 5: Enable Integration
Enable indicator integration, alongside order flow and footprint signals, in B4 CoPilot Pro for signals and/or confirmations to be processed.

Attachments
Last edited:
